

TL;DR:
- Prometheus 3.0 supports resource attribute promotion, meaning resource fields like
service.nameordeployment.environment.nameare converted into standard metric labels instead of being stored intarget_infotime series. - The blog also warns that while this feature adds richer context (labels) to series, it can raise cardinality sharply, giving guidance to promote only stable, low-churn resource attributes and to monitor
prometheus_tsdb_head_seriesand series growth rates after rollout. - With this change you can query metrics directly by service or environment, e.g.:
sum(rate(http_server_request_duration_seconds_count{service_name="user-service", deployment_environment_name="production"}[5m])) by (service_name)No join with target_info required.
Introduction
When you export OpenTelemetry metrics to Prometheus, resource fields like service.name or deployment.environment don’t show up as metric labels. Prometheus drops them. To use them in queries, you’d have to join with target_info:
rate(http_server_request_duration_seconds_count{job="webshop/fraud-detection"}[5m]) * on(instance) group_left(service_name) target_info{service_name="fraud-detection"}This makes filtering and grouping more difficult than necessary.
Prometheus 3.0 changes that. It supports resource attribute promotion—automatically converting OpenTelemetry resource fields into Prometheus labels.
This blog explains how it works and when to use it.
What Are Resource Attributes?
OpenTelemetry metrics carry two types of attributes:
- Metric attributes describe the event being measured, such as
http.status_codeordb.statement. These values change frequently. - Resource attributes describe the origin of the telemetry, like
service.name,k8s.namespace, orcloud.region. These stay constant across many metrics emitted by the same process.
Prometheus doesn’t distinguish between these. It treats everything as a label. But until recently, resource attributes weren’t included by default. This meant you couldn’t filter by environment or service name unless you used workarounds, like adding them manually to exporters or relying on target_info. With resource attribute promotion in Prometheus 3.0, that gap is finally closed.
If you’re setting up the OpenTelemetry Collector as the bridge between your services and Prometheus, this guide covers the exact steps.
How Prometheus Used to Handle Resource Attributes
Before Prometheus 3.0, OpenTelemetry resource attributes weren’t included as metric labels. Instead, they were exported as part of a separate target_info time series. This preserved the data, but made it harder to use.
If you wanted request rates for the fraud-detection service in production, you had to write something like:
sum( rate(http_server_request_duration_seconds_count[5m]) * on(instance) group_left(service_name, deployment_environment_name) target_info{ service_name="fraud-detection", deployment_environment_name="production" })These queries are slow because they rely on vector matching. Prometheus has to join two time series (http_server_request_duration_seconds_count and target_info) based on a shared label like instance. That means aligning timestamps, matching label sets, and holding more data in memory—all at query time.
This kind of join works for occasional lookups, but it becomes a problem when used in dashboards, alerts, or high-cardinality environments. The more series involved, the more memory Prometheus needs to keep the join in place. Over time, this increases query latency and can even cause timeouts.
Resource Attribute Promotion in Prometheus
Prometheus 3.0 introduces a native solution to the resource label gap. Instead of storing resource attributes in target_info, Prometheus can now promote them directly to metric labels.
This happens at the OTLP receiver level, before metrics are written to storage. When a metric comes in over the OTLP endpoint, Prometheus checks for configured resource attributes and attaches them as labels to every metric emitted by that resource.
Configuration Example
To enable promotion, define which resource attributes to convert:
otlp: promote_resource_attributes: - service.name - service.namespace - service.version - deployment.environment.name - k8s.cluster.name - k8s.pod.name - cloud.availability_zone - cloud.regionPrometheus transforms each entry by replacing dots with underscores. So:
service.name→service_namedeployment.environment.name→deployment_environment_name
These become standard metric labels and are available in every query.
Optional: Keep target_info for Compatibility
You can keep the old resource export alongside the new labels using:
otlp: keep_identifying_resource_attributes: trueThis is useful if you still have dashboards or alerts that rely on target_info joins. Both formats will be available during the transition.
What Changes in the Metrics
Consider a metric with these resource fields:
service.name = "user-service"service.namespace = "auth"deployment.environment.name = "production"k8s.pod.name = "user-service-7d4f8b9c-xyz"With promotion enabled, Prometheus will label the metric like this:
service_name="user-service"service_namespace="auth"deployment_environment_name="production"k8s_pod_name="user-service-7d4f8b9c-xyz"You can now filter or group by these attributes directly in PromQL:
sum(rate(http_server_request_duration_seconds_count{ service_name="user-service", deployment_environment_name="production"}[5m])) by (service_name)No joins. No extra series. Just usable labels on every metric.
For a broader look at how OpenTelemetry and Prometheus differ in their design and data models, this comparison breaks it down clearly.
Resource Attribute Promotion Comes with a Cost and Value
Promoting resource attributes increases label cardinality. That’s not always a bad thing.
More labels mean more granularity. You get better filtering, more accurate dashboards, and the ability to pinpoint issues faster. Want to track request latency by service, version, and zone? You need those as labels.
The challenge isn’t cardinality itself; it’s uncontrolled cardinality.
Say you promote:
service.name– 50 valuesdeployment.environment.name– 3 valuescloud.availability_zone– 10 valuesk8s.pod.name– 100 values
That’s up to 150,000 unique series per metric. In practice, you’ll hit a lower number; services aren’t deployed everywhere, but the scale is real.
Prometheus stores each unique labelset as a separate time series. More series means more memory, more disk usage, and potentially slower queries.
Choose Labels That Add Value
Not every attribute is worth promoting. Focus on the ones that help you debug or slice data meaningfully.
Good candidates:
service.name– Needed for any kind of service-level analysis.service.namespace– Useful in multi-team setups.deployment.environment.name– Helps isolate issues to a specific environment.
Optional, depending on use case:
service.version– Important for deployments and release tracking.cloud.availability_zone– Useful for infra-level outages.k8s.cluster.name– Valuable in multi-cluster environments.
High churn, use carefully:
k8s.pod.nameservice.instance.idcontainer.name
Avoid entirely:
- Anything user- or request-specific: IDs, tokens, timestamps
Monitor Series Growth
After enabling promotion, monitor the following:
# Label cardinality growthprometheus_tsdb_symbol_table_size_bytes
# New series raterate(prometheus_tsdb_head_samples_appended_total[5m])
# Total in-memory seriesprometheus_tsdb_head_series
If series count or memory usage spikes, revisit what you’re promoting.
Better Observability Without the Tradeoffs
Prometheus gives you control over what gets stored—but balancing granularity with cost is tricky.
High cardinality isn’t the problem. Poor handling is.
With Last9 as your telemetry data platform and Prometheus backend, you can safely promote OpenTelemetry resource attributes, like service.version, cloud.region, or k8s.pod.namewithout worrying about query timeouts or memory pressure.
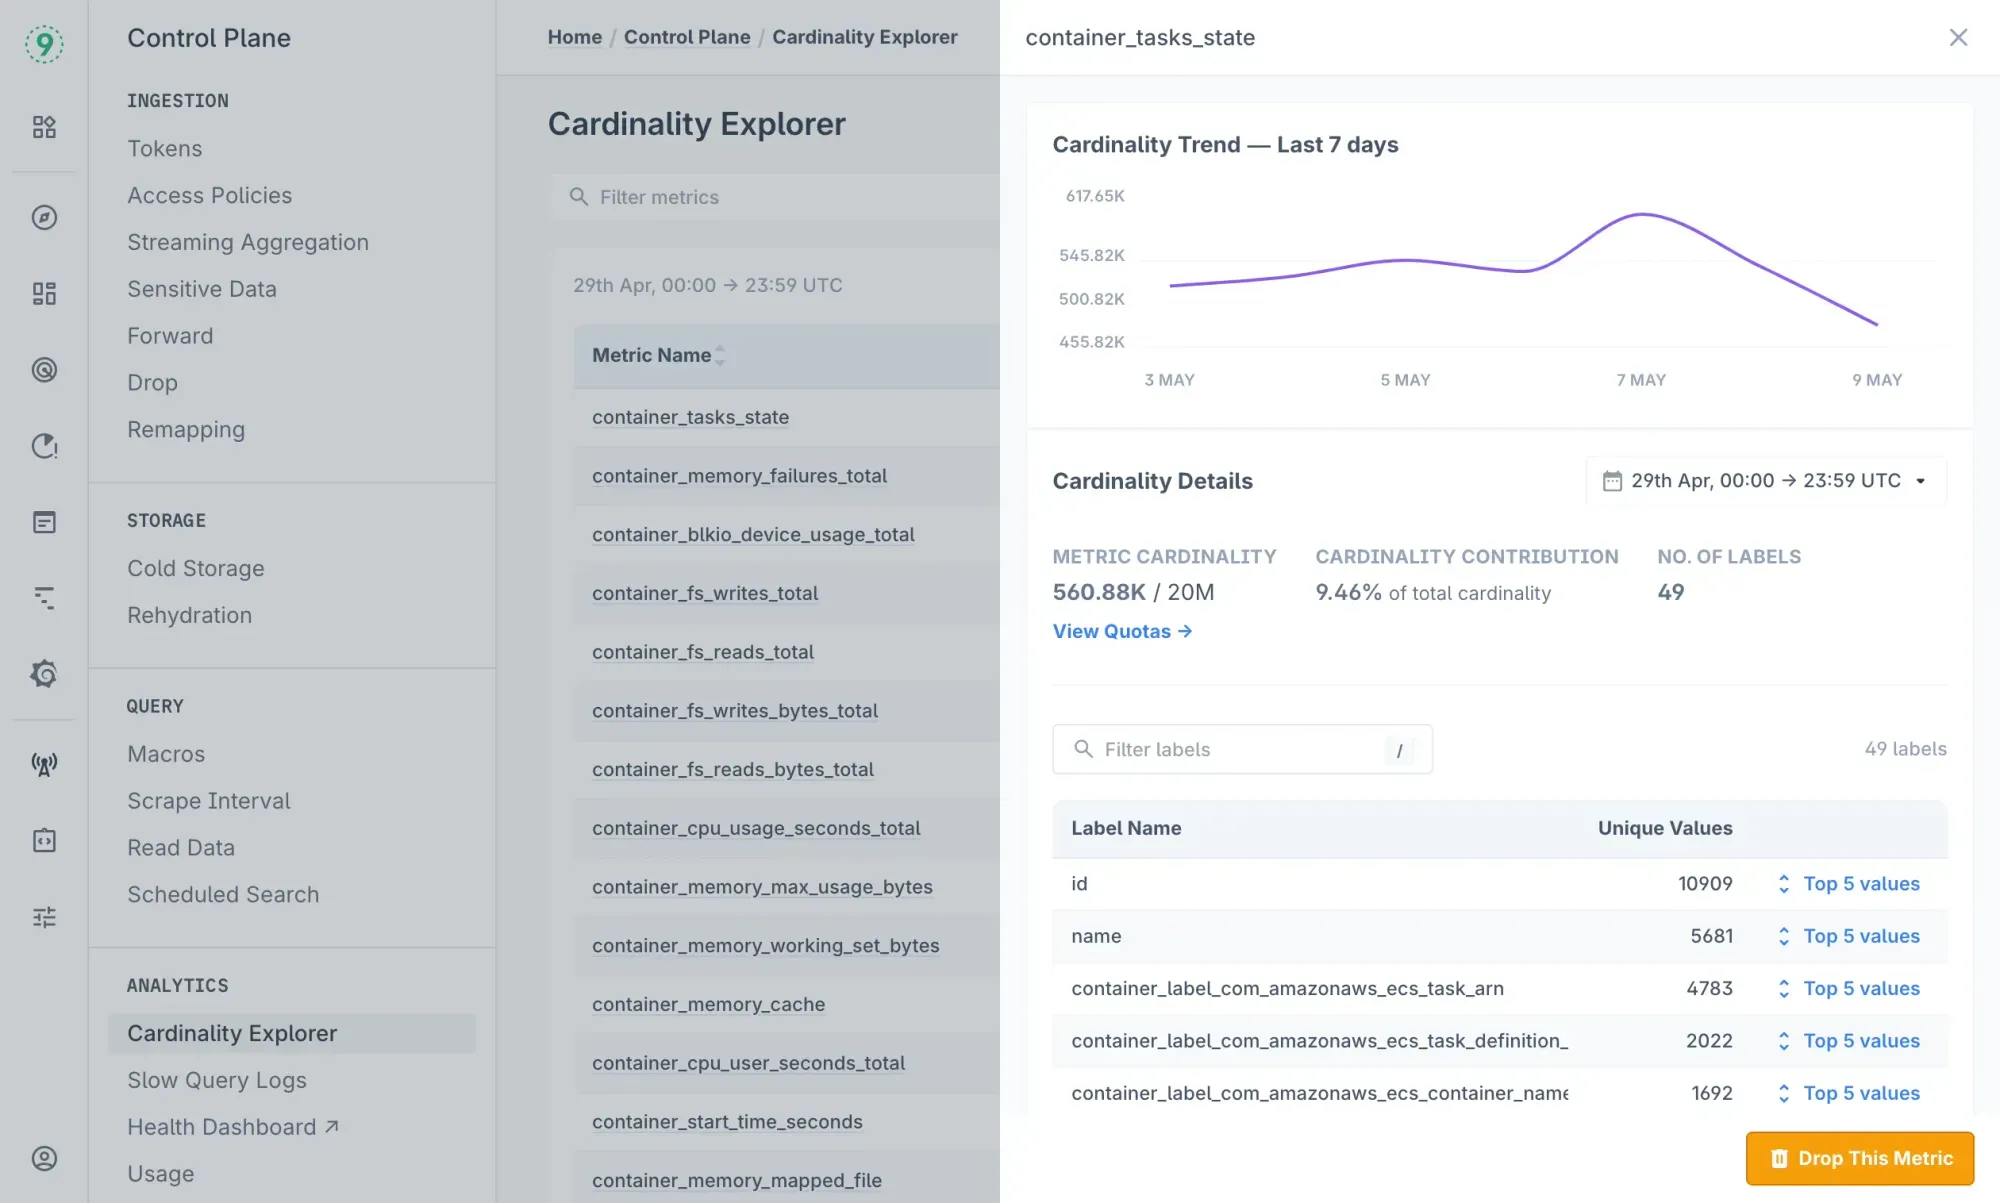
- Use Cardinality Explorer to spot metrics with runaway labels before they cause issues.
- Need faster dashboards or smaller alert workloads? Streaming Aggregations let you drop labels at ingest to keep things efficient.

With a default quota of 20 million time series per metric, you get full detail without sacrificing performance, even as your infrastructure grows.
How to Roll Out Resource Attribute Promotion Safely
Promoting resource attributes changes how your metrics are labeled. That affects query results, dashboard filters, and total series count. Rolling this out without a plan can introduce noise, or worse, break existing dashboards.
A staged rollout helps reduce risk and gives you time to evaluate which attributes are useful.
Step 1: Start with Core Attributes and Compatibility Mode
Begin with a limited set of attributes that you know are stable and low in cardinality—like service.name and deployment.environment.name.
Use keep_identifying_resource_attributes: true to preserve target_info labels during the transition. This ensures that existing dashboards and alerts relying on joins won’t break.
otlp: keep_identifying_resource_attributes: true promote_resource_attributes: - service.name - deployment.environment.nameLet this run for a few days. Monitor:
prometheus_tsdb_head_series– total series in memoryrate(prometheus_tsdb_head_samples_appended_total[5m])– rate of new samples- Query latency and dashboard performance
If the metrics hold steady, gradually add more attributes. Prioritize ones that provide meaningful breakdowns without high churn.
otlp: keep_identifying_resource_attributes: true promote_resource_attributes: - service.name - service.namespace - deployment.environment.name - service.version # added after validationThis approach gives you full control over how much detail gets added—and when.
Step 2: Customize Based on Environment
Your attribute promotion strategy doesn’t have to be the same everywhere. Tailor it based on the purpose of the environment.
Production environments typically favor stability and lower cardinality:
otlp: promote_resource_attributes: - service.name - service.namespace - deployment.environment.nameDevelopment or staging environments often need more visibility for debugging and testing:
otlp: promote_resource_attributes: - service.name - service.namespace - deployment.environment.name - service.version - k8s.pod.name - k8s.node.nameThis separation gives you detailed metrics where you need them, and leaner configurations where you don’t.
Migrating from target_info-Based Queries to Promoted Labels
If you’ve already instrumented services with OpenTelemetry and built dashboards using target_info, you don’t need to switch everything overnight. Resource attribute promotion is backward-compatible, which means you can migrate incrementally without breaking alerts or dashboards.
Here’s a step-by-step approach:
Step 1: Enable Promotion with Compatibility Mode
Start by enabling attribute promotion, but keep target_info available for existing queries.
otlp: keep_identifying_resource_attributes: true promote_resource_attributes: - service.name - service.namespace - deployment.environment.nameThis gives you both sets of labels:
target_info{service_name=...}for existing dashboardsservice_name="..."for new PromQL patterns
Step 2: Migrate Alert Rules First
Alerts are easier to update and test than dashboards. They’re typically smaller, with simpler logic.
Before (with target_info join):
up{job=~"production/.*"} * on(instance) group_left(service_name) target_info{service_name="critical-service"} == 0After (with promoted labels):
up{service_name="critical-service", deployment_environment_name="production"} == 0Cleaner, faster, and easier to debug.
Step 3: Migrate Dashboards Gradually
Next, start updating dashboard queries. Focus on your most-used views first.
Before:
sum( rate(http_server_request_duration_seconds_count[5m]) * on(instance) group_left(service_name) target_info{deployment_environment_name="production"}) by (service_name)After:
sum(rate(http_server_request_duration_seconds_count{deployment_environment_name="production"}[5m])) by (service_name)Once you’ve updated core dashboards, the rest of the migration becomes routine.
Step 4: Remove Compatibility Mode
After all key queries and dashboards are updated, you can stop exporting target_info.
otlp: keep_identifying_resource_attributes: false promote_resource_attributes: - service.name - service.namespace - deployment.environment.nameThis reduces storage overhead and avoids duplicate series.
If you’re working with resource attributes in PromQL, this guide shares useful query patterns and tricks worth knowing.
PromQL Patterns with Promoted Resource Attributes
Once resource attribute promotion is in place, your PromQL becomes more readable and easier to reason about. Here are a few common query patterns that benefit directly from promoted labels.
Service-Level RED Metrics
Basic request rate for a single service:
sum(rate(http_server_request_duration_seconds_count{ service_name="user-service", deployment_environment_name="production"}[5m]))Error rate (5xx responses only):
sum(rate(http_server_request_duration_seconds_count{ service_name="user-service", deployment_environment_name="production", http_response_status_code=~"5.."}[5m]))/sum(rate(http_server_request_duration_seconds_count{ service_name="user-service", deployment_environment_name="production"}[5m]))95th percentile request duration:
histogram_quantile(0.95, sum(rate(http_server_request_duration_seconds_bucket{ service_name="user-service", deployment_environment_name="production"}[5m])) by (le))Cross-Service Error Rate Comparison
Compare error rates across services within a namespace:
sum(rate(http_server_request_duration_seconds_count{ service_namespace="auth", deployment_environment_name="production", http_response_status_code=~"5.."}[5m])) by (service_name)/sum(rate(http_server_request_duration_seconds_count{ service_namespace="auth", deployment_environment_name="production"}[5m])) by (service_name)Infrastructure-Level View
Request rate broken down by availability zone:
sum(rate(http_server_request_duration_seconds_count{ deployment_environment_name="production"}[5m])) by (cloud_availability_zone)These kinds of queries were possible before, but only with complex joins using target_info. With resource attribute promotion, they become straightforward, fast, and easier to scale across teams.
Final Thoughts
Resource attribute promotion significantly improves the OpenTelemetry + Prometheus integration. You get cleaner queries, simpler dashboards, and consistent use of OpenTelemetry’s semantic conventions, without the overhead of target_info joins.
The key is to roll it out intentionally:
- Start with a small set of low-cardinality attributes
- Monitor series growth and query performance
- Expand gradually based on what adds real diagnostic value
Handle that well, and you’ll unlock better observability without the typical Prometheus tradeoffs.
If you want full control over OpenTelemetry ingest, without managing Prometheus internals, Last9 supports native resource attribute promotion effortlessly. Clean labeling, low overhead, and production-grade performance at scale.
Get started with us today, or if you’ve any questions, book a time with us!

