To clear Docker logs without stopping containers, run:
sudo sh -c 'truncate -s 0 /var/lib/docker/containers/*/*-json.log'Docker writes stdout and stderr to JSON files in /var/lib/docker/containers/, and by default, there's no rotation. These files grow continuously—sometimes hitting gigabytes per container in high-traffic environments or when debug logging makes it to production.
The truncate approach works immediately. The logging process keeps writing to the now-empty file, and disk space is freed without disrupting containers. For longer-term solutions, you'll want rotation configured at the daemon level or proper forwarding to external storage.
Why Docker Logs Fill Up Disk Space
Docker writes everything your container prints to a single JSON log file at:
/var/lib/docker/containers/<container-id>/<container-id>-json.logIt just keeps appending. There’s no built-in rotation, so the file grows for as long as the container runs.
Some patterns make this balloon quickly:
- Debug logs accidentally left on in production
- High-traffic services with very chatty output
- Libraries that log more than you expect
- Error loops that keep writing the same message
Teams usually notice this only when something else breaks: a build fails with “no space left on device,” or SSH becomes slow because the disk is full. By then, a single log file may be several gigabytes.
The space issue is the visible part. The hidden problem shows up during busy periods — containers may stop writing logs, new containers might not start cleanly, and your monitoring setup could miss signals right when you need them.
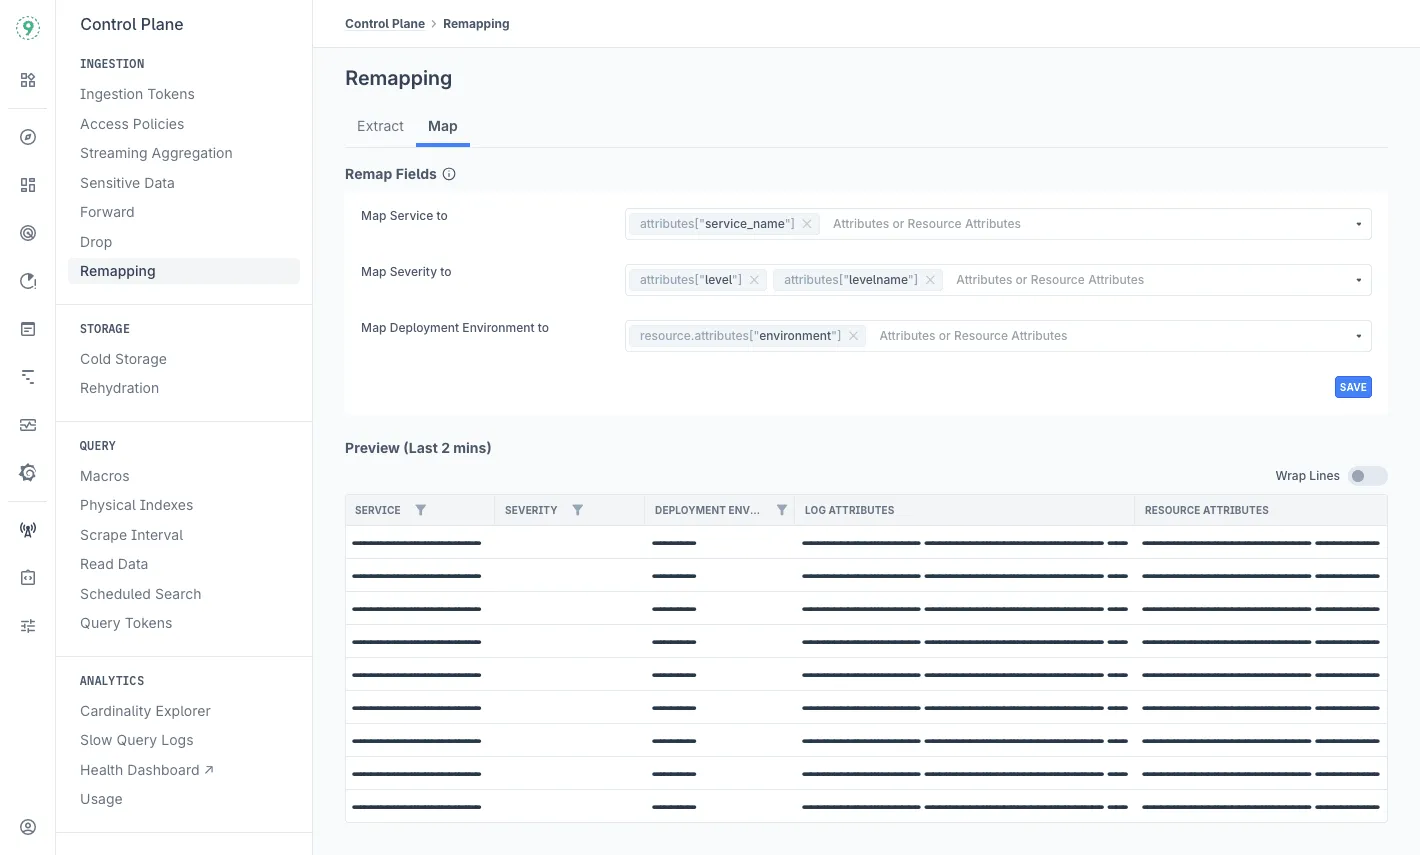
This is where Last9’s Control Plane helps. It gives you ingestion controls that let you drop or shape noisy logs before they reach storage, without touching your application. You keep the essential context and avoid unnecessary log growth.
Check Log Sizes Before Clearing Anything
Before trimming logs, it helps to know which containers are using the most space.
List all container log files sorted by size:
sudo du -h /var/lib/docker/containers/*/*-json.log | sort -hThis gives a clear view of disk usage per container. Files above 100MB usually deserve a quick look, and anything crossing 1GB should be handled soon.
You can also inspect container-level disk usage:
docker ps --sizeThe SIZE column shows the writable layer size, including logs. If a container looks unusually heavy, oversized logs are often the reason.
High log growth can come from many sources — debug logging, error loops, or simply busy workloads. Tracking how fast logs expand helps avoid disk pressure before it becomes a problem.
Once Docker or Kubernetes workloads are sending data to Last9, the Control Plane gives you real-time visibility into ingestion patterns. You can spot containers pushing excess logs, set attribute-based drop rules at the edge, and keep high-value labels without letting noisy logs take over your storage or budget.
3 Methods to Clear Docker Logs
When disk space starts running low, you have a few safe ways to clear large Docker log files without breaking running containers. Here are the approaches we recommend.
1. Truncate All Container Logs
sudo sh -c 'truncate -s 0 /var/lib/docker/containers/*/*-json.log'This resets every container log file to zero bytes. Containers keep running, Docker continues writing new logs, and disk space frees up instantly.
This works well when you need quick recovery — for example, after fixing a logging change or before putting proper rotation in place.
2. Truncate Logs for a Single Container
docker inspect --format='{{.LogPath}}' <container-id> | xargs truncate -s 0Replace <container-id> with the actual container ID or name.
Use this when one service is responsible for most of the log growth. It avoids touching other containers and keeps the cleanup focused.
3. Remove Containers (When You’re Restarting the Stack Anyway)
docker-compose down
docker-compose rm -v
Stopping and removing containers also clears their logs entirely. This is only practical if you’re restarting the application stack and don’t need the existing logs. Be sure to back up any volumes first.
A Quick Note on Safety
Truncation is generally safer than deleting log files outright. Removing the file can break Docker’s file handle, which may stop logs from being written until the container is restarted. Truncating avoids that risk and keeps everything running smoothly.
Configure Log Rotation to Prevent Future Issues
Truncating logs solves the immediate pressure on disk space. To keep things steady over time, it helps to put a simple rotation policy in place so log files don’t grow unchecked.
Global Configuration
You can set rotation rules for every container by updating /etc/docker/daemon.json:
{
  "log-driver": "json-file",
  "log-opts": {
    "max-size": "10m",
    "max-file": "3"
  }
}
This caps each log file at 10MB and keeps three rotated files per container. Restart Docker to apply the change:
sudo systemctl restart dockerA quick note: existing containers won’t pick up these settings automatically. Recreating them ensures they follow the new limits.
Per-Container Configuration
If you prefer finer control, you can set log limits when starting an individual container:
docker run --log-driver json-file --log-opt max-size=10m --log-opt max-file=3 your-imageOr through Compose:
services:
  your-service:
    image: your-image
    logging:
      driver: "json-file"
      options:
        max-size: "10m"
        max-file: "3"
Both approaches give you predictable log growth and avoid oversized files on disk.
How Last9 Supports This Workflow
Rotation keeps things tidy, but it also spreads logs across multiple small files. During an incident, that often means checking rotated logs in Docker, reviewing metrics somewhere else, and tracing requests in another place.
With the Docker integration sending logs, metrics, and traces over OTLP, the Control Plane gives you one place to manage how container signals enter the system. Instead of tuning log limits on every container, you set ingestion rules at the platform level. You can:
- filter high-volume container logs
- keep the attributes that matter for debugging
- Route-specific log patterns to different storage paths
- drop noisy output without changing Docker logging drivers or container configs
And when something breaks, the signals coming from your Docker workloads — logs, metrics, and traces — show up together with native correlation.
Troubleshooting Common Log Issues
Even with rotation and cleanup in place, a few quirks can show up while working with Docker logs. Here are some quick checks that help resolve them.
Logs Keep Growing Even After Setting max-size
If log files continue to grow, it usually comes down to one of these:
- Docker wasn’t restarted after updating
daemon.json - The containers were created before the new settings and are still using the old config
- A different logging driver is active for the container, so the rotation rules don’t apply
Verifying the logging driver (docker inspect <id>) and restarting Docker usually clears this up.
docker logs Shows No Output After Cleanup
This often happens when the log file was removed instead of truncated. Docker keeps a file handle open, so deleting the file breaks the link.
Restart the container to restore logging:
docker restart <container-id>Using truncate -s 0 keeps the file in place and avoids this issue altogether.
Disk Space Doesn’t Free Up Immediately
Sometimes the filesystem still holds references to old log data. You can clear cached blocks with:
sudo sync && sudo sh -c 'echo 3 > /proc/sys/vm/drop_caches'Then recheck disk usage with:
df -hThis forces the system to release cached pages so the freed space shows up correctly.
If you’re running Docker inside Kubernetes, log files accumulate across nodes rather than a single host. Cleanup commands need to run on each node, or you can automate the process with a small DaemonSet that handles pruning.
The Real Challenge During Incidents: Context Lives in Too Many Places
Log rotation keeps disk space under control, but it doesn’t simplify debugging when a container misbehaves. During an incident, you’re often switching between multiple sources to understand what actually happened:
- Docker logs for the raw error
- Prometheus for CPU and memory patterns
- Jaeger or another tracer for request flow
- CloudWatch or Loki for aggregated logs
All of these tools offer valuable data — the difficulty is that they offer it separately. Each has its own query format, time window, and retention rules, so you end up stitching information together manually. It adds friction at a moment when you want answers quickly.
Imagine a container throwing a “database connection timeout.” You can see the error right away, but the next set of questions lives outside the log:
- Was the container under memory pressure?
- Did another service trigger a spike in traffic?
- Did the network slow down briefly?
Finding those answers means moving between systems and lining up timestamps yourself.
Why Rich Docker Log Context Helps — and Why It’s Hard to Use
Docker logs naturally carry a lot of useful detail:
- Container ID
- Service or pod name
- Version tags
- Hostname
- Custom labels from your build or deploy process
This context is valuable during incidents because it helps narrow down where the issue sits and what changed.
The challenge isn’t the volume of labels — it’s that many log systems only let you query efficiently if you’ve pre-defined which combinations matter. If you want to filter by container + version + region, some platforms need that pattern configured in advance. If it wasn’t, the query becomes slow or impossible.
So even though the logs contain the right clues, you can’t always ask the question you need in the moment.
How Last9 Brings the Pieces Together
This is the gap we close. Last9 treats rich labels as first-class signals. You can filter logs using any label combination — no prior indexing rules, no guessing which fields you’ll need later. And because logs, metrics, and traces all land in the same place, the context lines up automatically.
That means when something goes wrong, you get the error, the resource pattern, and the request flow on the same timeline — with the full label set intact.

External Logging for Production Systems
Local log storage works for a while, but once your services grow or you need reliable history, you’ll want to move logs to a system designed for long-term storage and analysis.
How Your Logging Setup Usually Evolves
Stage 1: Manual Clearing
- Cron jobs that truncate log files
- Logging in to nodes to free space
- Clearing logs reactively when something fills the disk
This is fine early on, but it becomes tedious as container counts rise or when you need historical logs for audits.
Stage 2: External Log Aggregation
- ELK Stack
- Loki
- Fluentd / Fluent Bit
At this stage, you’ve moved logs off disk, but your workflow often becomes spread across tools. Logs live in one system, metrics in another, traces somewhere else. You still end up switching dashboards to debug an issue.
Stage 3: Unified Telemetry
- Logs, metrics, and traces in one place
- One query interface
- Automatic correlation between signals
This is where debugging starts to feel simpler. Instead of jumping between three tools, you have a single view that ties everything together.
What This Looks Like
Here’s how the difference shows up during day-to-day work:
| When You Use Traditional Tools | When You Use Last9 |
|---|---|
| Ship logs to Elasticsearch | Last9 auto-discovers your services and connects logs, metrics, and traces |
| Manage a separate Grafana | Grafana is built in with full log context |
| Run Jaeger for tracing | Traces link to logs automatically |
| Build dashboards to stitch data together | Correlation works without custom wiring |
| Pay per GB of logs | Event-based pricing with controls before ingestion |
| Pre-define index fields | Query with any label combination instantly |
During an Incident, the Difference Is Clear
With a traditional setup:
A container crashes → you check logs → then Prometheus → then Jaeger → then align timestamps yourself → then build a timeline.
With Last9:
You open one view and see the memory spike, slow request, and error log together on the same timeline. No context switching, no chasing clues.
Get started with us today!
Automate Log Cleanup in CI/CD
Your CI runners and build servers can run into the same disk pressure as production nodes. Adding a small cleanup step to your pipeline helps keep things stable without manual intervention.
Jenkins Example
pipeline {
    agent any
    stages {
        stage('Clean Logs') {
            steps {
                sh 'docker system prune -f'
                sh 'truncate -s 0 /var/lib/docker/containers/*/*-json.log'
            }
        }
    }
}
This clears unused Docker artifacts and resets container log files so your build environment starts fresh.
GitHub Actions Example
name: CI Cleanup
on:
  push:
    branches:
      - main

jobs:
  cleanup:
    runs-on: ubuntu-latest
    steps:
      - name: Clean Docker logs
        run: |
          sudo truncate -s 0 /var/lib/docker/containers/*/*-json.log
          docker system prune -f
On shared CI runners, try to coordinate cleanup so it doesn’t collide with parallel jobs. On dedicated runners, you can schedule this cleanup between builds to keep disk usage predictable.
Patterns That Help You Manage Docker Logs
A few simple habits make Docker log growth easier to keep under control:
- Monitor log size regularly — it helps you spot unexpected growth early
- Configure rotation before deployment — add
max-sizeandmax-fileindaemon.jsonordocker-compose - Use
truncate, notrm— containers continue logging without needing a restart - Forward logs to external storage — local logs act as a short-term buffer
- Define log volume expectations — knowing what “normal” looks like reduces guesswork during incidents
In production environments, external forwarding is usually the better long-term approach. Local logs are for quick access; your central system handles retention and search.
FAQs
How often should I clear Docker logs?
Monitor log sizes weekly in non-production environments. For production, configure automatic rotation and forward logs externally instead of clearing manually. Clear logs when disk usage exceeds 80% as an emergency measure.
Will clearing logs affect my running containers?
Using truncate -s 0 doesn't affect running containers. The logging process continues writing to the now-empty file. Deleting the file entirely may disrupt logging until the container restarts.
Can I recover logs after clearing them?
No. Truncated or deleted logs are gone. Forward logs to an external system before clearing in production environments.
Why do my logs keep growing after setting max-size?
New settings only apply to newly created containers. Existing containers keep their original logging configuration. Restart Docker, then recreate containers to apply the new limits.
What's the difference between docker logs and the JSON log files?
docker logs reads from the JSON log files stored in /var/lib/docker/containers/. They’re the same data—one is the storage format, the other is the command-line interface to read it.
How does log rotation work with Docker Compose?
Docker Compose uses the same logging configuration as standalone containers. Set log options in your docker-compose.yml under the logging key for each service.
Can I use different log drivers to reduce disk usage?
Yes. The local driver includes compression and better performance. The json-file driver is default but offers more compatibility with tools that parse JSON logs.
{
  "log-driver": "local",
  "log-opts": {
    "compress": "true",
    "max-size": "10m"
  }
}
What permissions do I need to clear Docker logs?
Root or sudo access to /var/lib/docker/. This is why most commands in this guide use sudo.